Rain Gardens
Rain gardens are an easy and effective tool that we can use to help reduce stormwater runoff from residential properties. These gardens are strategically placed to intercept pollutant laden stormwater runoff until it can be fully absorbed into the ground. Their design allows the rain garden to serve almost as a bowl that collects water from downspouts or overland flow across a property. The water is then able to slowly infiltrate into the underlying soil. Rain gardens can come in all different shapes and sizes but are best when planted with native plants that are indigenous to the Chesapeake Bay watershed. These plants require little maintenance once established, have deep roots that soak up lots of water, provide food and habitat to wildlife, and are beautiful.
Many localities that currently have a stormwater utility fee offer a monetary credit for the correct installation and maintenance of a rain garden. For more information on how to receive this credit please contact your locality.
Build It Yourself
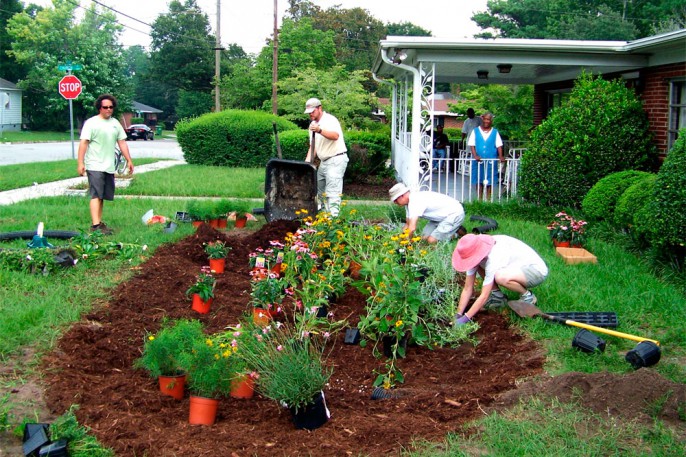
Installing a rain garden on your property is something that most homeowners can do all by themselves. With the help of some of the resources provided below and some sweat equity, you can make an impact on water quality and beautify your landscape. A rain garden is an investment, but costs little more than traditional landscaping beds.
The steps below outline the process of building your own rain garden. For additional information on the steps outlined in this section, please utilize the resources section provide below.
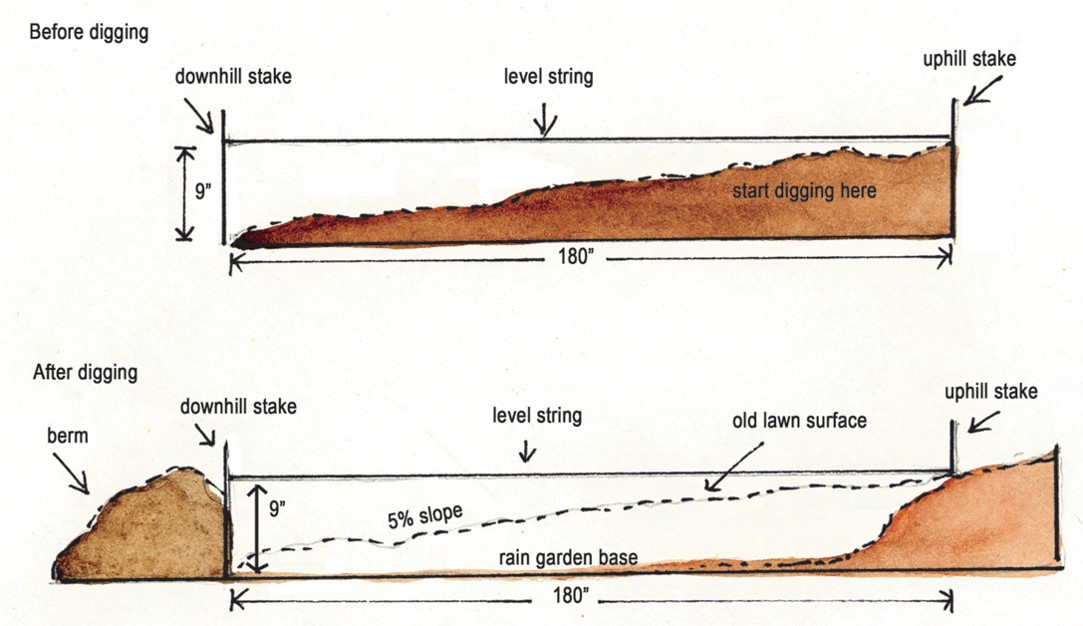
- Choosing a location: Choosing a rain garden location is very important and there are many things to consider. The rain garden should be located in a place that can collect as much impervious area (driveway, roof, sidewalks) runoff as possible. The best areas are generally where water naturally drains but doesn’t hold water. It should also be located at least 5’-15’ away from your home. Other things to consider are existing tree roots, retaining walls, utilities, overflow, setbacks/easements, basements, and the groundwater table.
- Call Miss Utility before digging: This may be the most important step. Dig safely, call Miss Utility.
- Soil infiltration test: Without soil infiltration your rain garden may turn into a Koi pond. Conducting an infiltration test will let you know if the location is good for a rain garden and even how large it may need to be. If the infiltration is really low you may not want to locate the rain garden in that particular location.
- Sizing the rain garden: You will want to base the surface area of your rain garden on the contributing drainage area to the rain garden. You will also want to consider the infiltration rate and depth of the rain garden.
- Excavate the rain garden: This is where you may want to enlist in a little help. When digging to your desired depth remember that your topsoil can be amended and reused in the rain garden or spread on your property. The subsoil can be used to create the rain garden berm, amended and spread on your property, or hauled off site. Your rain garden depth will likely be between 18”-36” deep, with 6” ponding area and 12”-30” of soil amendments.
- Fill the rain garden with soil media mix: The soil mix placed back in the excavated rain garden, or hole at this point, should consist of ~ 50% sand, 25% topsoil, and 25% compost. Additional sand can always be added to the mix but limiting your clay content in the mix is very important. The mix should have very little clay as it impedes water from infiltrating into the soil.
-

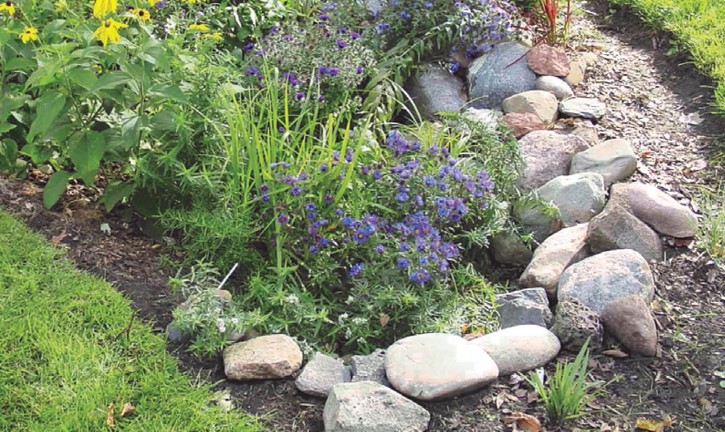
Large stones can be placed on the perimeter to reinforce the rain garden during storms.
Plant and mulch: This is the fun part and when you start to visualize the final product. When choosing your plants consider the direction the rain garden faces as the south facing slope will typically receive the most sun and heat. Consider how the plants handle water as the middle of the rain garden may be slightly wetter than the outer edges. Remember, native plants are always your best option when planting because they need little maintenance once established, will love the growing conditions, and offer benefits to wildlife all while being beautiful additions to your landscaping. See the Native Plant Center and Native Plants for Rain Gardens for help in selecting your plants.
- Maintenance. Rain garden require about as much maintenance as a standard landscaped bed. In the first year weeding, watering, and raking mulch is about the extent of the maintenance for your rain garden. You may have to tweak the rain garden a bit as you see how it functions throughout the years.

One hurdle to consider before digging your own rain garden is the excavated soil management. It is possible to use some of the topsoil found on site in your amended soil mix, and the excavated subsoil as a downhill berm to capture water in the rain garden, but there is a good chance you will have excess soil on your hands after excavation. Before digging consider where this soil may be used in your yard and how you will stabilize it.
Anatomy of a Rain Garden

Berms help retain water on steep slopes and can be made from excavated soil from the garden. They can be vegetated or compacted and mulched as seen above.
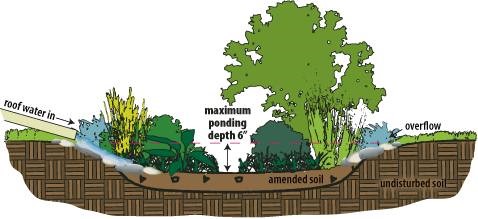
A rain garden can be boiled down to three main components: plants, soils and cover.
Plants
- Select native plants for wetland edge vegetation
- Consider sun, partial sun, shade
- Should contribute to native wildlife
- Should be aesthetically pleasing
Soils
- Loose soils that offer filtration and allow easy root growth
- Amend soils if necessary
- 50%-60% sand
- 20-30% topsoil (low clay content)
- 20-30% compost
Cover (gravel or mulch)
- Offers soil erosion control
- Traps moisture in soil and moderates soil temperature
- Large stones can be used for reinforcement during storms
Rain gardens are made up of a bowl-like depression in the ground. On the downhill side (opposite side of where water will enter), a raised berm of soil is placed to allow water to sit in the garden are infiltrate into the soil. The shape of a rain garden is usually similar to a “kidney bean” to allow the garden to accept a wide sheet flow of runoff and consolidate it in to the garden base.
How Rain Gardens Work
The existing soil within the rain garden is removed (or amended) and replaced with a more permeable soil typically consisting of a mix of sand, topsoil, and compost. These soils will allow for easier water percolation. Sizing of rain gardens is dependent upon the amount of water that is expected to enter it during a rain event. The rain garden is planted with trees, shrubs, and perennials before being covered in a layer of mulch. The completed rain garden will have a slight depression that is used to temporarily collect runoff so it can infiltrate slowly. They have the same look and feel as any other conservation landscape bed, but with the added benefit of increased stormwater infiltration.

Native plants typically have deeper roots relative to exotic plants, which allow for better water absorption.